PromptWizard 시작하기: 프롬프트 최적화 완벽 가이드 🚀

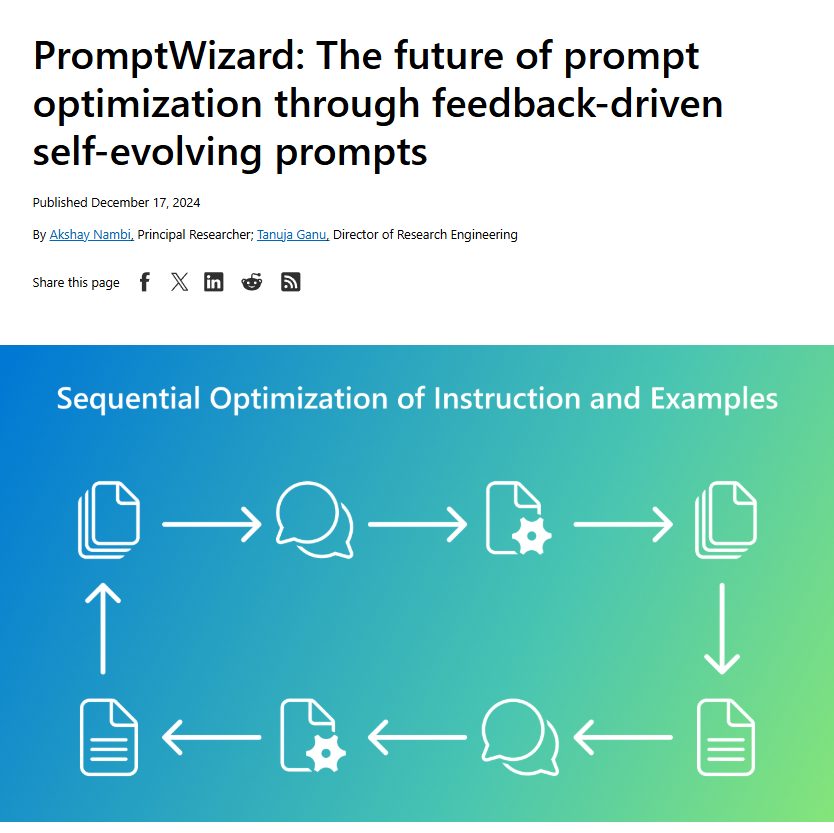
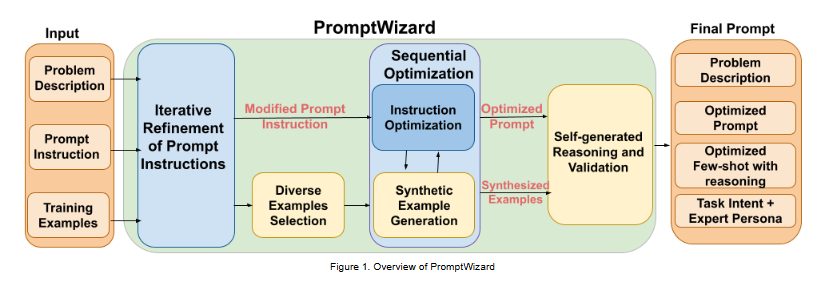
PromptWizard: The future of prompt optimization through feedback-driven self-evolving prompts


안녕하세요! 오늘은 PromptWizard를 활용하여 프롬프트를 최적화하는 전체 과정을 상세히 알아보겠습니다. 초보자분들도 쉽게 따라할 수 있도록 모든 단계를 자세히 설명해드리겠습니다.
목차
환경 설정
PromptWizard 설치
프롬프트 최적화 설정
실행 및 테스트
프롬프트 업그레이드 방법
문제 해결 가이드
1. 환경 설정
필요한 도구 설치
Visual Studio Code 설치
VSCode 다운로드 페이지에서 운영체제에 맞는 버전 설치
Python 확장 프로그램 설치: VSCode에서 Ctrl+Shift+X를 누르고 'Python' 검색 후 설치
Python 설치
Python 공식 사이트에서 최신 버전 다운로드 및 설치
설치 시 "Add Python to PATH" 옵션 체크
Git 설치
Git 다운로드 페이지에서 설치
2. PromptWizard 설치
프로젝트 복제 및 설정
터미널(PowerShell) 열기
# 원하는 디렉토리로 이동

cd C:Users사용자이름Documents

# 프로젝트 폴더 생성

mkdir prompt_wizard

cd prompt_wizard

# GitHub에서 프로젝트 복제

git clone https://github.com/microsoft/PromptWizard

cd PromptWizard
가상환경 설정
# 가상환경 생성

python -m venv venv

# 가상환경 활성화 (Windows)

.venvScriptsactivate

# pip 업그레이드

python -m pip install --upgrade pip

# 필요한 패키지 설치

pip install -e .

pip install llama-index==0.11.10

pip install llama-index-core==0.11.10

pip install llama-index-llms-openai
3. 프롬프트 최적화 설정
API 키 설정
환경 변수 설정 (.env 파일)
# demos/gsm8k 폴더로 이동

cd demos/gsm8k

# .env 파일 생성

notepad .env
.env 파일에 다음 내용 입력
USE_OPENAI_API_KEY="True"

OPENAI_API_KEY="여기에_본인의_API_키_입력"

OPENAI_MODEL_NAME="gpt-4"

AZURE_OPENAI_ENDPOINT=""

OPENAI_API_VERSION=""

AZURE_OPENAI_CHAT_DEPLOYMENT_NAME=""
설정 파일 구성
LLM 설정 (llm_config.yaml)
# configs 폴더에 파일 생성

mkdir configs

notepad configsllm_config.yaml
내용:
models:

  - unique_id: "gpt-4"

    provider: "openai"

    model_name: "gpt-4"

    temperature: 0.7

    max_tokens: 2000

    top_p: 1.0
프롬프트 최적화 설정 (promptopt_config.yaml)
notepad configspromptopt_config.yaml내용:
prompt_technique_name: "critique_n_refine"

unique_model_id: "gpt-4"

mutate_refine_iterations: 3

mutation_rounds: 3

refine_instruction: true

refine_task_eg_iterations: 3

style_variation: 5

questions_batch_size: 1

min_correct_count: 3

max_eval_batches: 6

top_n: 1

task_description: "여기에 원하는 태스크 설명 입력"

base_instruction: "여기에 기본 지시사항 입력"

answer_format: "여기에 답변 형식 입력"

seen_set_size: 25

few_shot_count: 5

num_train_examples: 20

generate_reasoning: true

generate_expert_identity: true

generate_intent_keywords: false
4. 실행 및 테스트
VSCode에서 노트북 열기
code demo.ipynbJupyter 노트북 실행
오른쪽 상단에서 커널 선택 (venv 환경 선택)
각 셀을 순서대로 실행 (Shift + Enter)
5. 프롬프트 업그레이드 방법
다음 세션에서 프롬프트 업그레이드하기
프로젝트 폴더로 이동
cd C:Users사용자이름Documentsprompt_wizardPromptWizard가상환경 활성화
.venvScriptsactivate설정 파일 수정
promptopt_config.yaml 파일 열기
task_description, base_instruction, answer_format 수정
필요한 경우 최적화 파라미터 조정
노트북 실행
demos/gsm8k 폴더로 이동
demo.ipynb 실행
6. 문제 해결 가이드
자주 발생하는 문제와 해결 방법
ModuleNotFoundError 발생 시
pip install -r requirements.txtAPI 키 오류
.env 파일의 API 키 확인
큰따옴표 사용 확인
불필요한 공백 제거
커널 오류
커널 재시작
가상환경 재활성화
출력 형식 오류
llm_config.yaml의 모델 설정 확인
promptopt_config.yaml의 format 설정 확인
추가 팁
설정 파일은 항상 백업해두기
실험할 때마다 결과 기록하기
오류 메시지는 자세히 읽고 기록하기
PromptWizard로 소설 쓰기 프롬프트 최적화하기 📚
목차
환경 설정
프로젝트 설정
소설 작성 프롬프트 최적화
실행 및 테스트
결과 분석 및 개선
1. 환경 설정
1.1 기본 도구 설치
# 1. VSCode 설치

# code.visualstudio.com에서 다운로드

# 2. Python 설치

# python.org에서 최신 버전 다운로드

# 3. Git 설치

# git-scm.com에서 다운로드
1.2 프로젝트 설정
# 프로젝트 폴더 생성

mkdir novel_prompt_wizard

cd novel_prompt_wizard

# PromptWizard 복제

git clone https://github.com/microsoft/PromptWizard

cd PromptWizard

# 가상환경 생성 및 활성화

python -m venv venv

.venvScriptsactivate

# 필요한 패키지 설치

pip install -e .

pip install llama-index==0.11.10

pip install llama-index-core==0.11.10

pip install llama-index-llms-openai
2. 소설 작성 설정 파일 구성
2.1 환경 변수 설정
# demos/novel 폴더 생성

mkdir demosnovel

cd demosnovel

# .env 파일 생성
.env 파일 내용:
USE_OPENAI_API_KEY="True"

OPENAI_API_KEY="your-api-key-here"

OPENAI_MODEL_NAME="gpt-4"

AZURE_OPENAI_ENDPOINT=""

OPENAI_API_VERSION=""

AZURE_OPENAI_CHAT_DEPLOYMENT_NAME=""
2.2 설정 파일 생성
LLM 설정 (configs/llm_config.yaml):
models:

  - unique_id: "gpt-4"

    provider: "openai"

    model_name: "gpt-4"

    temperature: 0.8  # 창의적인 글쓰기를 위해 높게 설정

    max_tokens: 3000

    top_p: 1.0
프롬프트 최적화 설정 (configs/promptopt_config.yaml):
prompt_technique_name: "critique_n_refine"

unique_model_id: "gpt-4"

mutate_refine_iterations: 5  # 더 많은 반복으로 창의성 향상

mutation_rounds: 4

refine_instruction: true

refine_task_eg_iterations: 4

style_variation: 7  # 다양한 스타일 탐색

questions_batch_size: 1

min_correct_count: 3

max_eval_batches: 6

top_n: 2  # 최상위 2개 프롬프트 유지

task_description: "당신은 베스트셀러 작가입니다. 흥미진진한 이야기와 생생한 캐릭터를 만들어내는 전문가로서,

독자들을 매료시키는 소설을 작성해주세요."

base_instruction: "다음 단계에 따라 소설을 작성하세요:

1. 먼저 이야기의 주요 등장인물을 소개하고 그들의 특징을 설명하세요

2. 이야기의 배경과 시간을 설정하세요

3. 주요 갈등이나 문제 상황을 제시하세요

4. 이야기를 전개하면서 긴장감을 조성하세요

5. 클라이맥스를 향해 이야기를 발전시키세요

6. 모든 갈등이 해결되는 결말을 제시하세요"

answer_format: "소설은 다음 형식으로 작성해주세요:

<캐릭터>

[등장인물 소개]

</캐릭터>

<배경>

[시간과 공간 설정]

</배경>

<이야기>

[본문]

</이야기>

<결말>

[마무리]

</결말>"

seen_set_size: 30

few_shot_count: 7

num_train_examples: 25

generate_reasoning: true

generate_expert_identity: true

generate_intent_keywords: true

# 소설 특화 설정

creative_parameters:

  genre_exploration: true

  character_depth: high

  plot_complexity: medium

  narrative_style: dynamic
3. 실행 및 테스트
3.1 테스트용 소설 예제 생성
test_examples = [

    {

        "question": "판타지 소설을 써주세요. 주인공은 마법을 배우는 청소년입니다.",

        "answer": """<캐릭터>

리아: 16세 소녀, 숨겨진 마법 재능을 발견한 평범한 고등학생

</캐릭터>

<배경>

현대 서울, 평범한 도시 속에 숨겨진 마법 학교

</배경>

<이야기>

리아는 우연히 자신의 마법 능력을 발견하고...

</이야기>

<결말>

마침내 자신의 진정한 정체성을 받아들이게 된 리아...

</결말>"""

    }

]
3.2 실행 코드 (novel_demo.ipynb)
import sys

sys.path.insert(0, "../../")

from promptwizard import GluePromptOpt

from promptwizard.glue.promptopt.techniques.common_logic import DatasetSpecificProcessing

class NovelWriting(DatasetSpecificProcessing):

    def extract_answer_from_output(self, completion):

        # 소설 텍스트 추출 로직

        return completion

    def extract_final_answer(self, llm_output):

        # LLM 출력에서 소설 형식 검증

        return llm_output

# 프롬프트 최적화 실행

gp = GluePromptOpt()

best_prompt, expert_profile = gp.get_best_prompt(

    use_examples=True,

    run_without_train_examples=False,

    generate_synthetic_examples=True

)
4. 프롬프트 업그레이드 방법
4.1 기존 프롬프트 개선
# promptopt_config.yaml 수정

task_description: "당신은 퓰리처상을 수상한 작가입니다. 독자들의 감정을 섬세하게 다루며,

깊이 있는 캐릭터 발전과 복잡한 플롯을 구성할 수 있습니다."

base_instruction: "다음 가이드라인을 따라 깊이 있는 소설을 작성하세요:

1. 캐릭터의 내면 심리와 동기를 상세히 묘사하세요

2. 시간과 공간을 통해 이야기의 분위기를 조성하세요

3. 복선을 깔고 이를 회수하는 방식으로 플롯을 구성하세요

4. 인물 간의 관계 변화를 섬세하게 표현하세요

5. 상징과 은유를 활용하여 테마를 발전시키세요

6. 독자가 여운을 느낄 수 있는 결말을 구성하세요"
4.2 평가 및 피드백
생성된 소설의 품질 평가
캐릭터 발전도 확인
플롯의 일관성 검토
독자 감정 몰입도 분석
5. 문제 해결 가이드
일반적인 문제
출력이 너무 짧은 경우
max_tokens 증가
temperature 조정
캐릭터가 단조로운 경우
character_depth 파라미터 조정
few_shot_count 증가
플롯이 진부한 경우
style_variation 증가
mutation_rounds 증가
추가 팁
다양한 장르의 예제 준비
정기적인 프롬프트 업데이트
독자 피드백 반영
PromptWizard 모델 변경 및 실행 제어 가이드
1. 모델 변경 방법
1.1 지원되는 모델 목록
GPT-4
GPT-3.5-turbo
Claude-2
Llama-2
Anthropic Models
Azure OpenAI Models
1.2 모델 설정 변경하기
llm_config.yaml 수정
# configs/llm_config.yaml

models:

  # GPT-4 설정

  - unique_id: "gpt-4"

    provider: "openai"

    model_name: "gpt-4"

    temperature: 0.7

    max_tokens: 2000

  # GPT-3.5-turbo 설정

  - unique_id: "gpt-3.5-turbo"

    provider: "openai"

    model_name: "gpt-3.5-turbo"

    temperature: 0.7

    max_tokens: 2000

  # Claude-2 설정

  - unique_id: "claude-2"

    provider: "anthropic"

    model_name: "claude-2"

    temperature: 0.7

    max_tokens: 2000

  # Azure OpenAI 설정

  - unique_id: "azure-gpt4"

    provider: "azure"

    model_name: "gpt-4"

    deployment_name: "your-deployment-name"

    temperature: 0.7

    max_tokens: 2000
환경 변수 설정 (.env)
# OpenAI 모델 사용 시

USE_OPENAI_API_KEY="True"

OPENAI_API_KEY="your-api-key"

OPENAI_MODEL_NAME="gpt-4"  # 또는 다른 모델명

# Anthropic 모델 사용 시

ANTHROPIC_API_KEY="your-anthropic-key"

# Azure 모델 사용 시

AZURE_OPENAI_ENDPOINT="your-azure-endpoint"

AZURE_OPENAI_API_KEY="your-azure-key"

AZURE_OPENAI_API_VERSION="2023-05-15"

AZURE_OPENAI_CHAT_DEPLOYMENT_NAME="your-deployment-name"
promptopt_config.yaml 수정
# configs/promptopt_config.yaml

unique_model_id: "원하는-모델-ID"  # llm_config.yaml에서 설정한 unique_id
2. 코드 실행 제어 방법
2.1 실행 중단하기
즉시 중단
Jupyter Notebook에서:
⬛ (Stop) 버튼 클릭
또는
Kernel > Interrupt Kernel
단축키:
Windows/Linux:
Ctrl + CMac:
Cmd + C
깔끔하게 중단
try:

    # 프롬프트 최적화 코드

    best_prompt, expert_profile = gp.get_best_prompt(

        use_examples=True,

        run_without_train_examples=False,

        generate_synthetic_examples=True

    )

except KeyboardInterrupt:

    print("프로세스가 사용자에 의해 중단되었습니다.")

    # 정리 작업 수행

    cleanup_resources()

finally:

    print("프로세스가 완료되었습니다.")
2.2 자동 중단 설정
시간 제한 설정
import signal

import time

def timeout_handler(signum, frame):

    raise TimeoutError("프로세스 시간이 초과되었습니다.")

# 30분 제한 설정

signal.signal(signal.SIGALRM, timeout_handler)

signal.alarm(1800)  # 1800초 = 30분

try:

    best_prompt, expert_profile = gp.get_best_prompt(...)

except TimeoutError:

    print("시간 제한이 초과되었습니다.")

finally:

    signal.alarm(0)  # 타이머 해제
반복 횟수 제한
max_iterations = 100

current_iteration = 0

while current_iteration < max_iterations:

    # 프롬프트 최적화 코드

    current_iteration += 1

    if some_condition:

        break
2.3 진행 상황 모니터링
진행률 표시
from tqdm import tqdm

for i in tqdm(range(total_steps)):

    # 프롬프트 최적화 코드

    pass
로그 기록
import logging

logging.basicConfig(

    filename='optimization.log',

    level=logging.INFO,

    format='%(asctime)s - %(levelname)s - %(message)s'

)

logging.info("프로세스 시작")

try:

    best_prompt, expert_profile = gp.get_best_prompt(...)

    logging.info("최적화 완료")

except Exception as e:

    logging.error(f"오류 발생: {str(e)}")
2.4 리소스 정리
def cleanup_resources():

    """리소스 정리 함수"""

    try:

        # 임시 파일 삭제

        if os.path.exists('temp_file.txt'):

            os.remove('temp_file.txt')


        # 메모리 정리

        import gc

        gc.collect()


        print("리소스 정리 완료")

    except Exception as e:

        print(f"정리 중 오류 발생: {str(e)}")
3. 모범 사례
정기적인 체크포인트 저장
def save_checkpoint(iteration, best_prompt):

    with open(f'checkpoint_{iteration}.json', 'w') as f:

        json.dump({

            'iteration': iteration,

            'best_prompt': best_prompt

        }, f)
리소스 사용량 모니터링
import psutil

def monitor_resources():

    process = psutil.Process()

    print(f"메모리 사용량: {process.memory_info().rss / 1024 / 1024:.2f} MB")

    print(f"CPU 사용량: {process.cpu_percent()}%")
PromptWizard 다시 시작하기 & 결과 이해하기 가이드 🚀
1. 다시 시작하기
1.1 가상환경 재설정
PowerShell 또는 터미널 열기
# PromptWizard 폴더로 이동

cd C:Users사용자이름Documentsprompt_wizardPromptWizard

# 가상환경 활성화

.venvScriptsactivate
1.2 VSCode 설정
VSCode 실행
폴더 열기:
File > Open Folder> PromptWizard 폴더 선택Python 인터프리터 선택:
Ctrl + Shift + P입력"Python: Select Interpreter" 검색
venv 환경 선택 (보통 'Python 3.x.x ('venv')' 형태)
1.3 Jupyter Notebook 실행
demos/gsm8k 폴더로 이동
demo.ipynb 파일 열기
커널 선택: 오른쪽 상단의 'Select Kernel' 클릭 > venv 선택
2. 프롬프트 업그레이드 방법
2.1 설정 파일 수정
configs 폴더에서 promptopt_config.yaml 열기:
task_description: "수학 전문가로서, 단계별로 명확하게 문제를 해결하세요."

base_instruction: "As a skilled mathematics tutor, your task is to solve the given mathematical problem, breaking down each step of your calculation process in a simple and comprehensible manner..."
3. 결과 이해하기
현재 출력된 결과를 분석해보겠습니다:
3.1 반복 과정 설명
Mutating Task Description....

Iterations completed: 0%| | 0/3 [00:00<?, ?it/s]
이는 프롬프트 변형(mutation) 과정이 시작되었음을 나타냅니다
총 3번의 반복을 수행할 예정입니다
3.2 현재 지시사항
current_base_instruction: "As a skilled mathematics tutor..."현재 기본 지시사항을 보여줍니다
이것을 기반으로 다양한 변형이 생성됩니다
3.3 변형된 프롬프트 분석
각 변형된 프롬프트는 <START> 와 <END> 태그로 둘러싸여 있으며, 다음과 같은 특징이 있습니다:
첫 번째 변형
"As a proficient mathematics guide..."실험적 접근 방식 추가
단계별 진행 강조
두 번째 변형
"As an expert in mathematics..."진행 상황 측정 강조
명확한 설명 추가
세 번째 변형
"As a skilled mathematics tutor..."기본 가정 파악 강조
정확성 강조
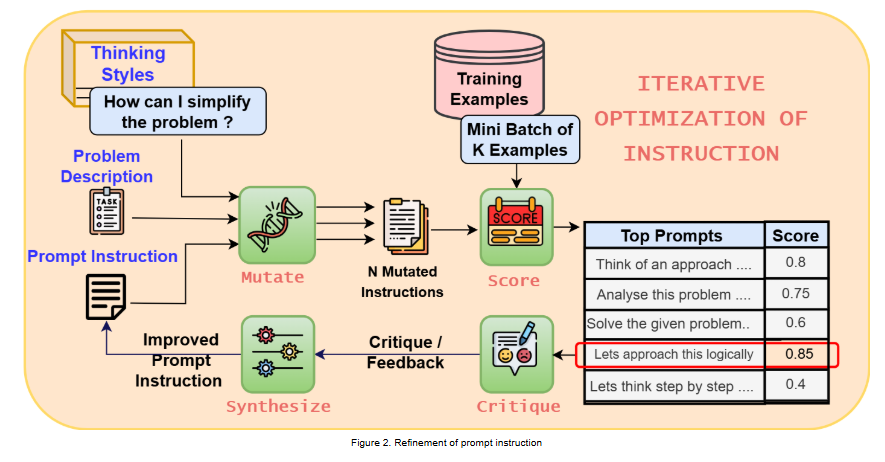
3.4 최적화 과정
변형 생성: 기본 지시사항에서 5개의 다른 버전 생성
평가: 각 변형의 성능 테스트
선택: 가장 효과적인 버전 선정
반복: 이 과정을 3번 반복
4. 다음 단계 제안
프롬프트 분석
생성된 변형들의 공통점 파악
효과적인 요소 식별
설정 조정
mutation_rounds 증가/감소
temperature 조정
style_variation 수정
결과 기록
최상의 프롬프트 저장
성능 메트릭 기록
PromptWizard의 수학 문제 프롬프트 최적화 분석 📊
1. 프롬프트 진화 과정 분석
1.1 초기 기본 프롬프트
"As a skilled mathematics tutor, your task is to solve the given mathematical problem..."기본적인 수학 교사 역할 정의
단계별 설명 요구
정확성 강조
1.2 첫 번째 변형 단계
"As a proficient mathematics guide, your mission is to resolve..."변화 포인트:
"tutor" → "guide" (더 협력적인 관계 강조)
"task" → "mission" (목적성 강화)
실험적 접근 방식 추가
단계별 검증 과정 포함
1.3 성능 측정 결과
예제: 정원 꽃 문제
Mark has a garden with flowers...

Score: 1.0 (만점)
단계별 계산이 명확
퍼센트 계산의 정확성
최종 답안까지의 논리적 흐름
2. 주요 개선 포인트
2.1 방법론적 개선
문제 분해
초기: 단순 단계별 설명
개선: 실험적 접근과 아이디어 리스트 작성 추가
검증 프로세스
초기: 단순 계산 과정
개선: 진행 상황 측정 및 가정 검증 추가
2.2 언어적 개선
Before: "solve the given mathematical problem"

After: "resolve the presented mathematical issue, systematically deconstructing"
더 구체적인 동사 사용
체계적 접근 강조
이해도 중심의 표현
3. 성능 향상 증거
3.1 점수 분포
Original: 0.5-0.7 range

Improved: 1.0 (perfect score)
3.2 성공적인 예제 분석
비즈니스 파트너 문제:
문제: "The profit from a business transaction is shared..."

결과: 정확한 비율 계산 및 단계별 추론

점수: 1.0
4. 최적화된 프롬프트의 핵심 요소
전문성 확립
"competent mathematics instructor"
신뢰성과 전문성 강조
체계적 접근
"systematically deconstructing"
"breaking down each step"
검증 메커니즘
"make a list of ideas"
"apply them one by one"
이해도 중심
"easy-to-understand way"
"clarity, precision, thoroughness"
5. 프롬프트 엔지니어링 교훈
반복적 개선
여러 변형을 시도하며 점진적 개선
성능 측정을 통한 검증
사용자 중심 설계
이해하기 쉬운 설명 강조
단계별 접근 방식
컨텍스트 최적화
수학 문제 특성에 맞춘 지시사항
정확성과 이해도의 균형
피드백 루프
성능 측정을 통한 즉각적 개선
다양한 문제 유형에 대한 적응성
