[UCA수퍼컴퓨팅학원] 리벨리온 ATOM NPU --(1)
KT클라우드에 설치된 리벨리온 ATOM NPU가 최근 개발자를 위한 NPU코딩 사용법을 공개해 눈길을 끕니다.

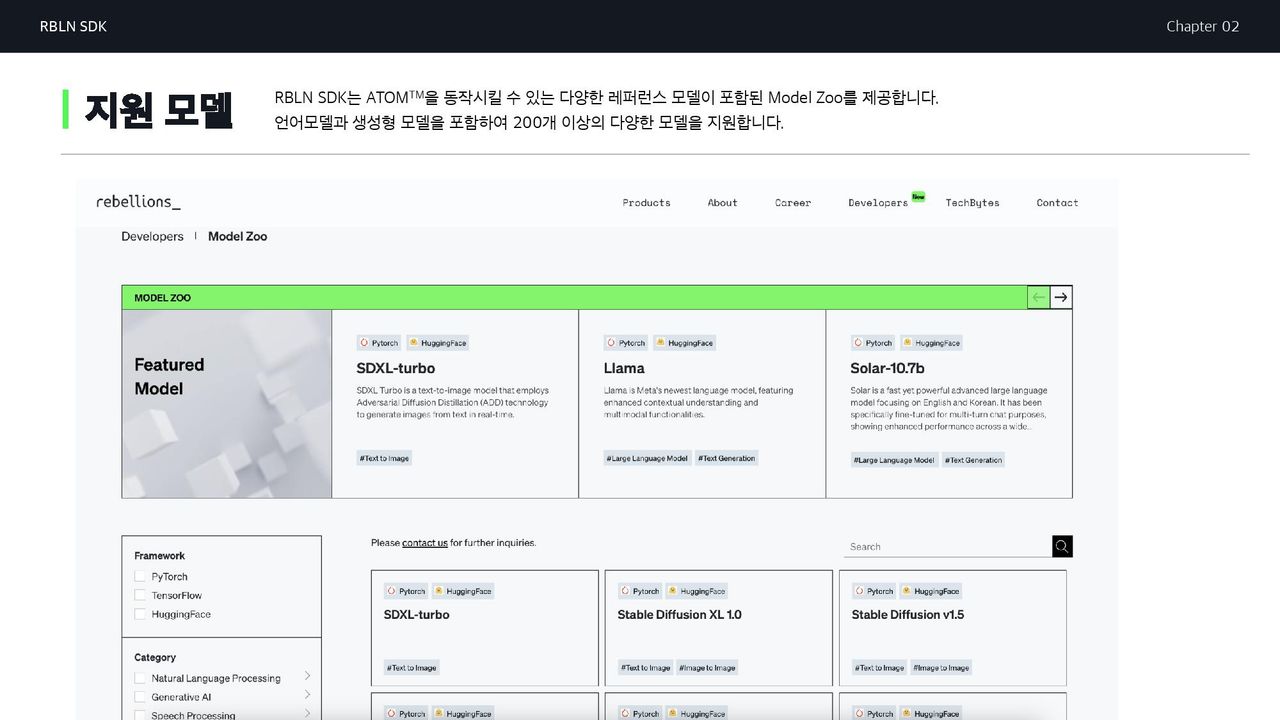
리벨리온 포탈에 가면 RBLN SDK, 모델 ZOO등을 다운로드 받을수있게합니다.
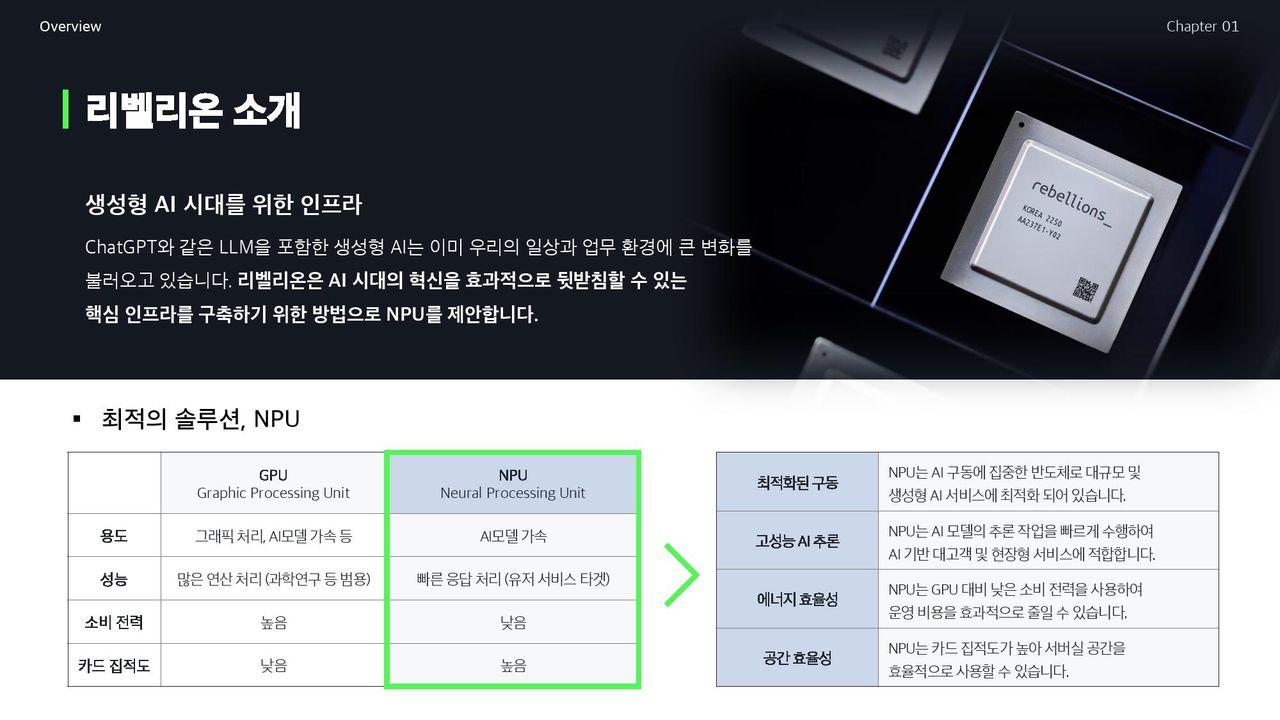
nVidia GPU는 딥러닝 학습과 연구에 필수적이지만, A100, H100, H200등 GPU 디바이스 가격이 1장에 9천만원을 호가하는등 너무 비싸고, 실제로 전기 먹는 하마입니다. 빅테크들이 수만 개를 선주문해서 스타트업이나 중소기업은 사실 nVidia GPU 실물을 손에 넣기도 힘듭니다. 이미 학습이 끝난 모델이라면 추론쪽은 국산 AI 가속기들중 NPU, TPU, LPU칩들에게 위임할수 있습니다. 저전력 기반이라 탄소를 발생시키지 않습니다. MS는 Azure GPU 클러스터를 운영하며, 약 13%나 탄소 발생량이 더 증가했습니다. 청정에너지인 풍력이나 파력으로 생성된 전기를 써서 기업의 프러덕트를 만들어야하고, 탄소배출권을 사야하는 현실에서 저전력칩은 상당한 메리트가 있습니다.
CNN 컨벌루션 네트워크 신경망이나 LSTM 장단기 메모리, 트랜스포머 모델 추론도 NPU가 지원합니다.

개발자라면 리벨리온의 NPU용 SDK에 눈독을 들일것입니다. 리벨리온은 전용 컴파일러와 API등 SW지원이 잘 되어있는데, ATOM NPU SDK는 텐서플로와 파이토치 개발자를 위해 나름 준비해둔 게 여러가지가 있습니다.
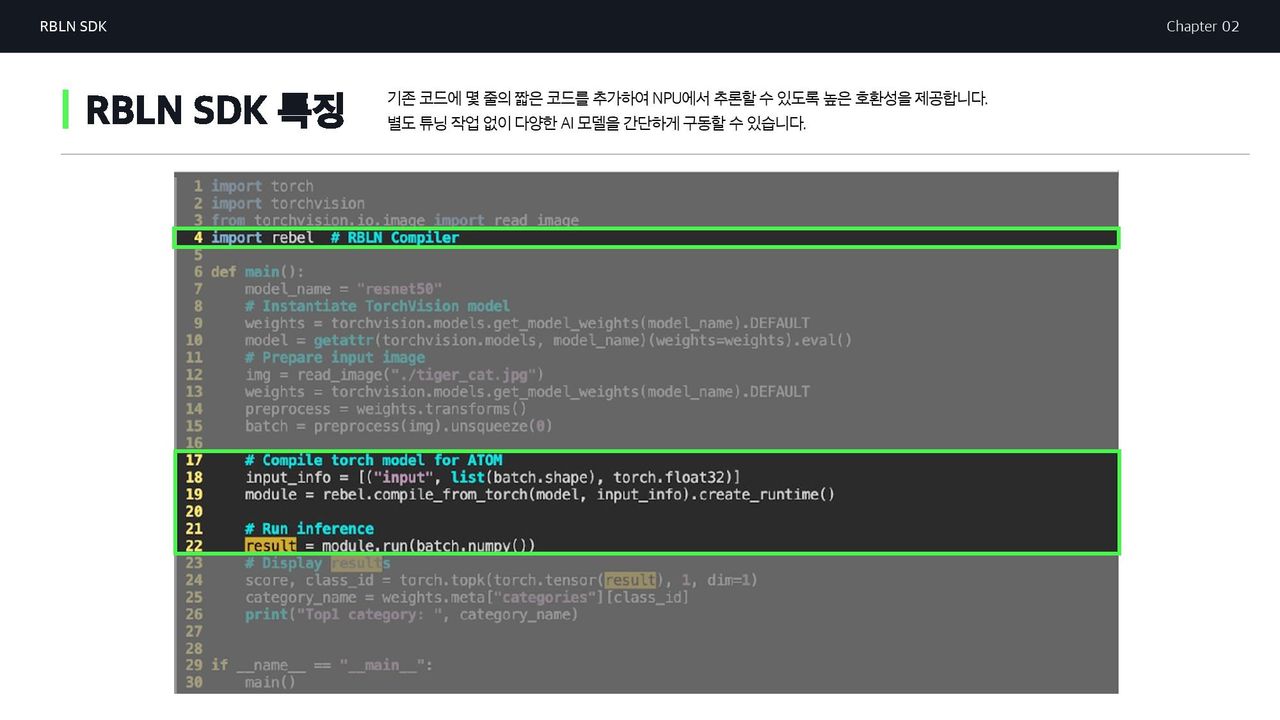
리벨리온의 ATOM NPU SDK는 기본 nVidia GPU기반 개발자가 작성하던 코드에 5~6줄 코드만 더 추가하면 NPU기반 코드가 돌아가게 설계했습니다. ONNX 런타임 변형등은 안해도 됩니다.
리벨리온의 포탈에는 모델 ZOO가 제공됩니다. NLP 모델및 생성형 AI모델등 약 200여개 모델이 준비중입니다.
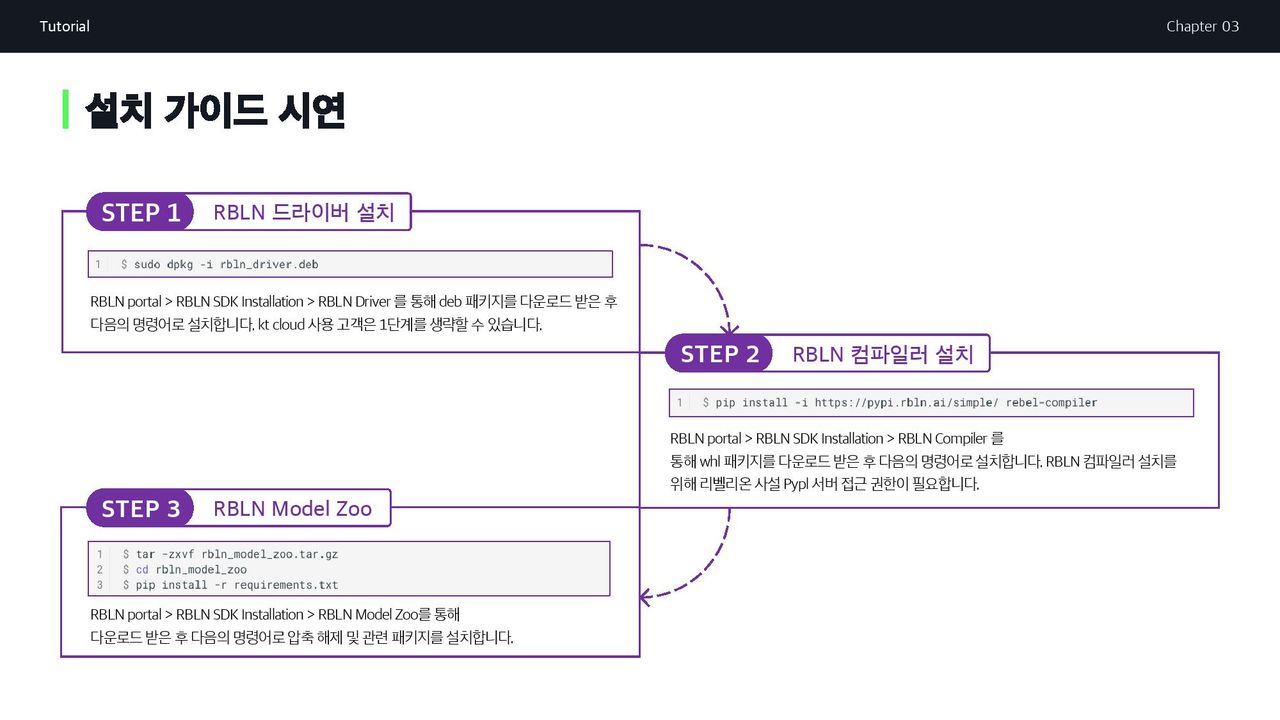
설치관련 개발자 문서는 아래 링크를 참고합니다.
docs.rbln.ai
Installation Guide -
Installation Guide ¶ RBLN SDK consists of device driver, compiler stack, and model zoo: RBLN Driver ( deb package ) RBLN Compiler ( whl package ) RBLN Model Zoo ( tar.gz ) Refer to the step-by-step installation guide provided below. Note that you need an RBLN portal account to proceed the installati...

드라이버는 우분투리눅스용 deb파일로 배포됩니다.
dpkg -i rbln_driver.deb 명령이면 설치됩니다.
컴파일러는 파이썬 whl 형태라 KT클라우드에서 리벨리온 포탈 접근 권한을 얻은뒤,
pip install -i https://pypi.rbln.ai/simple rebel-compiler
처럼 리벨리온의 RBLN 컴파일러를 pip 명령으로 설치할 수 있습니다.
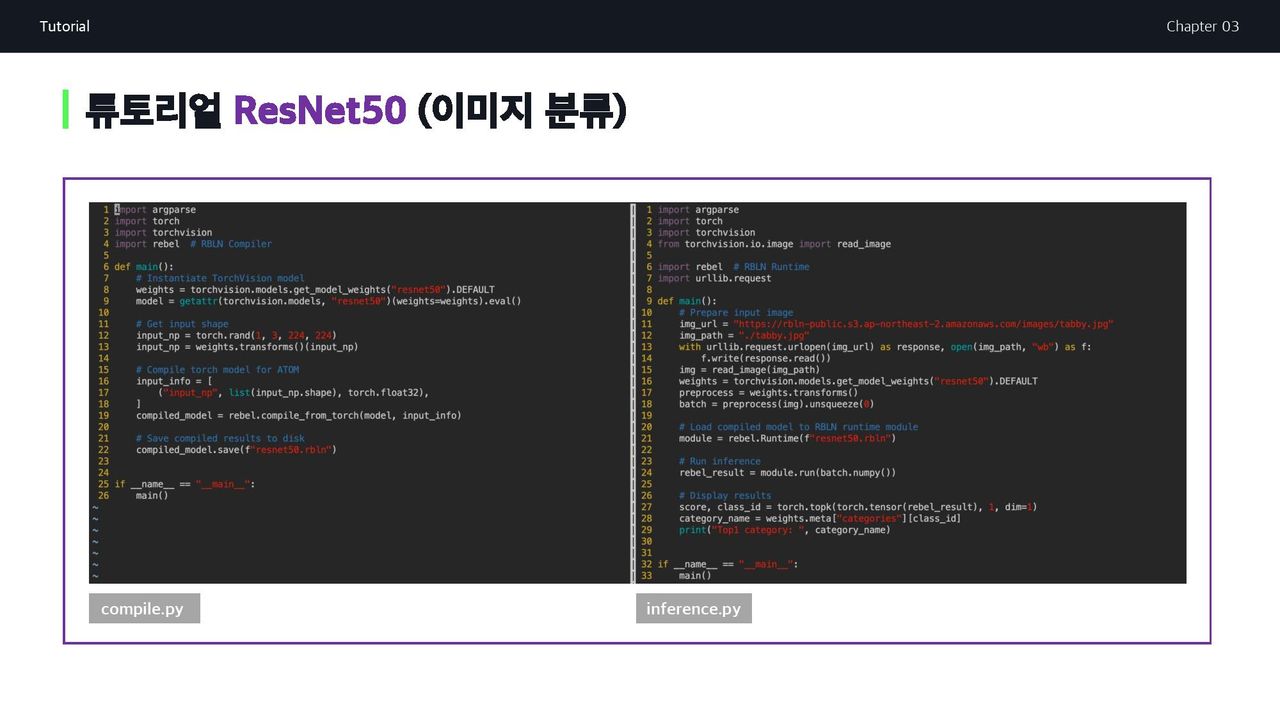
파이토치 ResNet50 모델 컴파일하고 추론에 사용하기
미리 훈련된 모델을 로드해 RBLN 컴파일러로 컴파일하고, 컴파일된 모델도 저장할 수 있습니다.
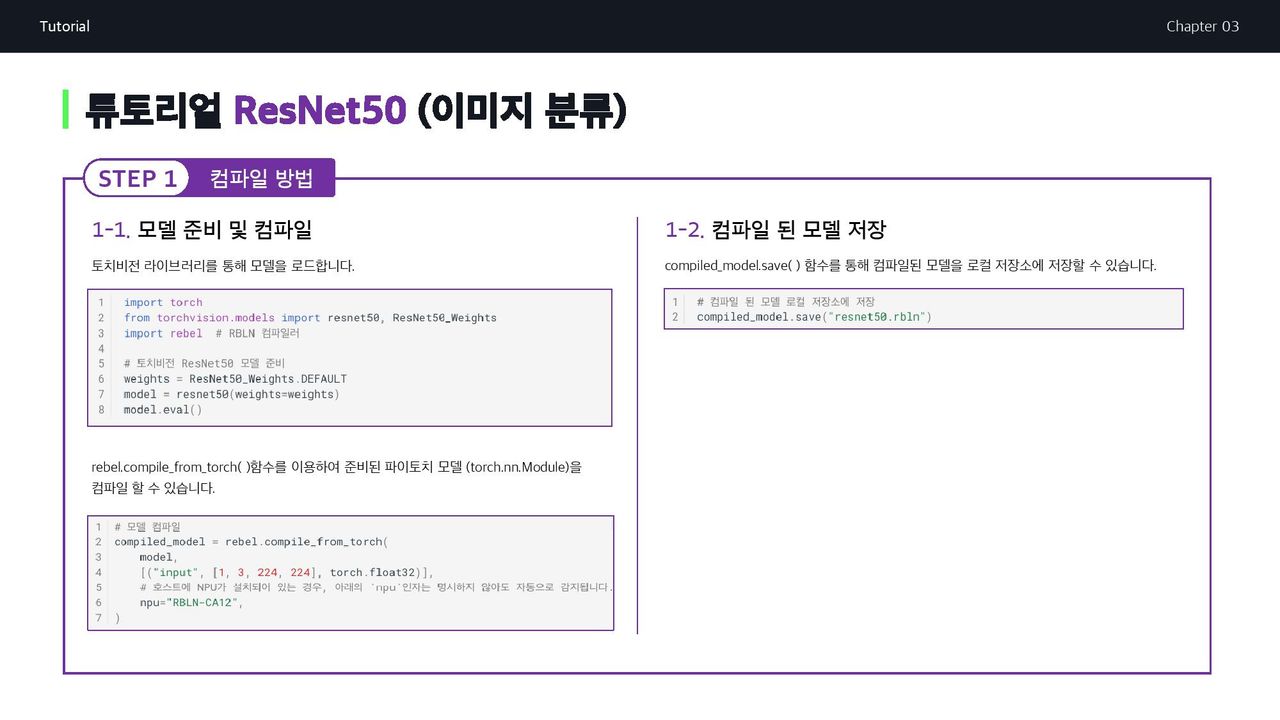
모델 준비
먼저 이미지분류에 사용되는 ResNet50 model을 TorchVision 라이브러리로 임포트한다.
import torch
from torchvision.models import resnet50, ResNet50_Weights
import rebel  # RBLN Compiler

# Instantiate TorchVision ResNet50 model
weights = ResNet50_Weights.DEFAULT
model = resnet50(weights=weights)
model.eval()
모델 컴파일
파이토치 모델 torch.nn.Module 이 준비되면
리벨리온의 rebel.compile_from_torch() 메서드를 사용하여 간단히 컴파일할 수 있습니다.
# Compile the model

compiled_model = rebel.compile_from_torch(
    model,
    [("input", [1, 3, 224, 224], torch.float32)],
    # If the NPU is installed on your host machine, you can omit the `npu` argument.
    # The function will automatically detect and use the installed NPU.
    npu="RBLN-CA12",
)
현재 리벨리온에 의해 지원되는 NPU 이름은 아래 두 가지입니다.
RBLN-CA02, RBLN-CA12
만약 우분투 머신에 NPU가 설치되어 있지 않은 경우,
오류를 방지하려면 npu 인수를 사용하여 대상 NPU를 지정해야 합니다.
만약 우분투 머신에 NPU가 설치되어 있는 경우,
rebel.compile_from_torch() 함수에서 우분투 머신에 설치된 NPU를 자동으로 감지하여 사용하므로 npu="RBLN-CA12"와 같은 npu 인수를 임의로 코드에서 생략할 수 있습니다.
대상 NPU의 이름이 확실하지 않은 경우 NPU가 설치된 호스트 컴퓨터의 셸에서 rbln-stat 명령을 실행하여 직접 확인할 수 있습니다.
컴파일된 모델 저장하기
컴파일된 모델을 로컬 저장소에 저장하려면 compiled_model.save() 메서드를 사용할 수 있습니다.
# Save the compiled model to local storage
compiled_model.save("resnet50.rbln")
배포하는 방법
이제 컴파일된 모델을 로드하고, 추론을 실행하고, 출력 결과를 확인하여 모델을 배포할 수 있습니다.
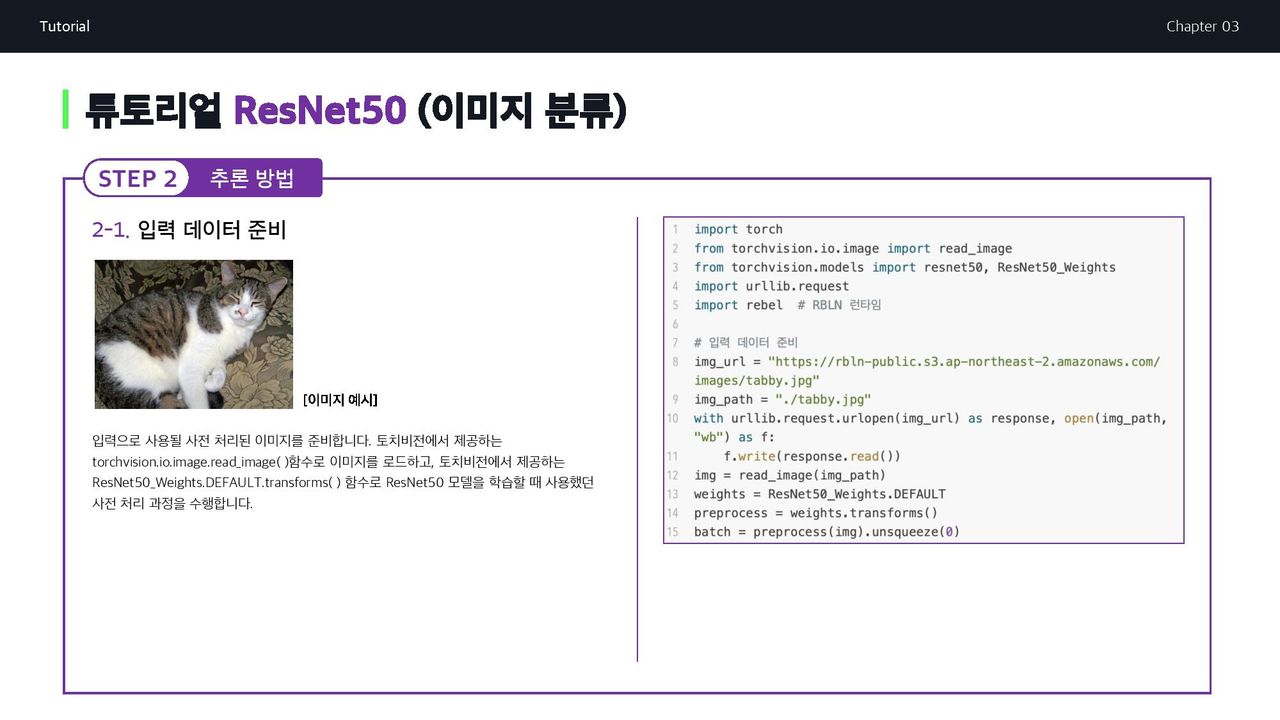
입력 데이터 준비하기
사전 학습된 ResNet50 모델에 필요한 입력 데이터로 전처리된 이미지를 준비해야 합니다. 얼룩고양이를 준비하겠습니다.
입력 이미지 로딩에는 torchvision.io.image.read_image()가, ResNet50의 기본 전처리 트랜스폼으로는 ResNet50_Weights.DEFAULT.transforms()가 사용됩니다.
import torch
from torchvision.io.image import read_image
from torchvision.models import resnet50, ResNet50_Weights
import urllib.request
import rebel  # RBLN Runtime

# Prepare the input
img_url = "https://rbln-public.s3.ap-northeast-2.amazonaws.com/images/tabby.jpg"
img_path = "./tabby.jpg"
with urllib.request.urlopen(img_url) as response, open(img_path, "wb") as f:
    f.write(response.read())
img = read_image(img_path)
weights = ResNet50_Weights.DEFAULT
preprocess = weights.transforms()
batch = preprocess(img).unsqueeze(0)
추론 실행
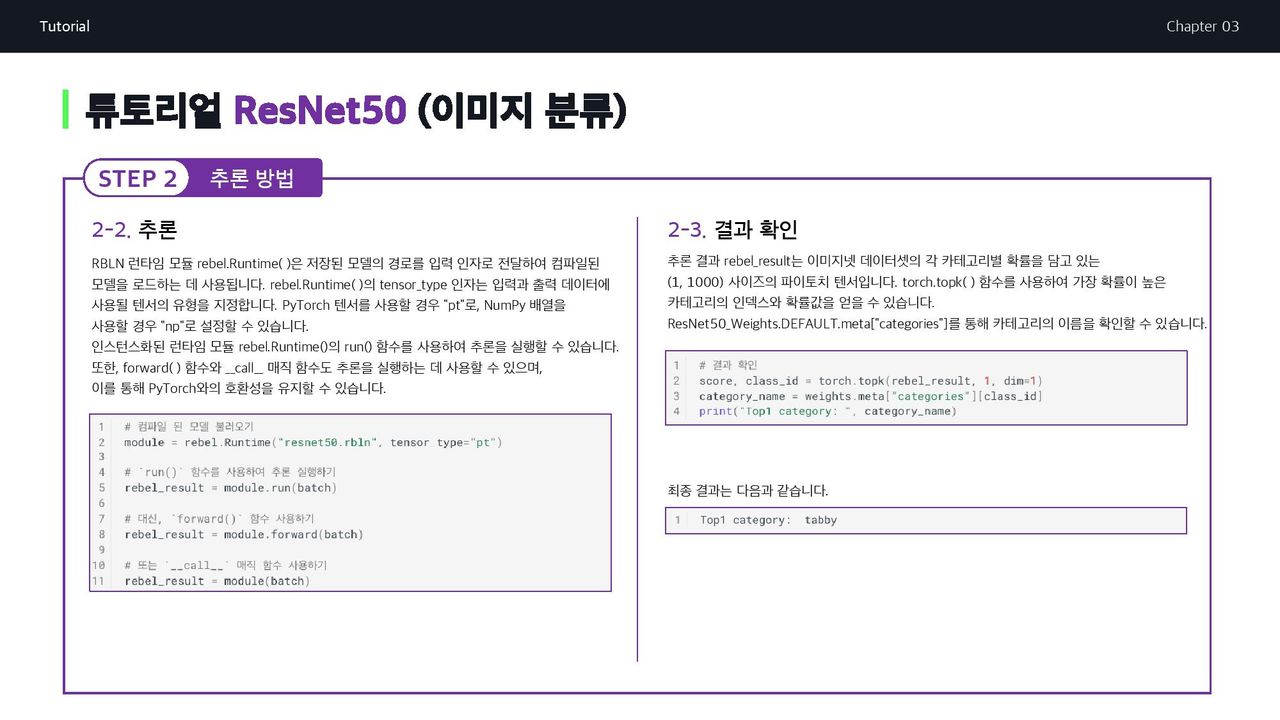
RBLN 런타임 모듈 rebel.Runtime()은 저장된 resnet50.rbln 모델의 경로를 입력 인수로 전달하여 컴파일된 모델을 로드합니다.
rebel.Runtime()의 tensor_type 인수는 입력 및 출력 데이터에 사용할 텐서 유형을 지정합니다. PyTorch 텐서의 경우 "pt" 또는 NumPy 배열의 경우 "np"라고 설정할 수 있습니다.
추론을 실행하기 위해 인스턴스화된 런타임 모듈 rebel.Runtime()의 run() 메서드를 사용할 수 있습니다. 또한, 앞으로() 메서드와 call 매직 메서드도 추론을 실행하는 데 사용할 수 있어 PyTorch의 인터페이스와의 호환성을 유지할 수 있습니다.
# Load the compiled model
module = rebel.Runtime("resnet50.rbln", tensor_type="pt")

# Run inference using the `run()` method
rebel_result = module.run(batch)

# Alternatively, use the `forward()` method
rebel_result = module.forward(batch)

# Or use the `__call__` magic method
rebel_result = module(batch)
forward() 또는 __call__을 사용하면 로드된 RBLN 모델을 파이토치 모델과 동일한 방식으로 사용할 수 있으므로 기존 파이토치 코드와 원활하게 통합할 수 있습니다.
print(module) 함수를 사용하면 입력/출력 형태, 컴파일된 모델 크기 등 런타임 모듈의 기본 정보를 확인할 수 있습니다.
추론 결과 확인
출력 rebel_result는 크기가 (1, 1000)인 파이토치 텐서이며, 각 요소는 ImageNet 데이터 세트에서 해당 카테고리의 점수입니다. torch.topk()를 사용하여 점수와 함께 Top1 클래스의 인덱스를 얻을 수 있습니다. Top1 클래스의 카테고리 이름은 이 인덱스로 ResNet50_Weights.DEFAULT.meta["categories"] 딕셔너리에서 검색할 수 있습니다.
# Check results
score, class_id = torch.topk(rebel_result, 1, dim=1)
category_name = weights.meta["categories"][class_id]
print("Top1 category: ", category_name)
얼룩고양이 (Tabby) 사진을 하나 준비하고, 리벨리온 NPU에게 이 사진이 뭐게 ? 라고 물어보는 코드이므로 Tabby 라고 응답이 나오게됩니다.기존 GPU응용 파이토치 코드에 5~6줄만 추가하면 된다니 세상 참 좋아졌네요.
rebel_result는 크기가 (1, 1000)인 파이토치 텐서라 카테고리별 확률에서 얼룩고양이 (Tabby)가 튀어나옵니다.
다음은 TorchVision ResNet50 모델의 컴파일을 위한 전체 코드 조각입니다.
import torch
from torchvision.models import resnet50, ResNet50_Weights
import rebel  # RBLN Compiler

# Instantiate TorchVision ResNet50 model
weights = ResNet50_Weights.DEFAULT
model = resnet50(weights=weights)
model.eval()

# Compile the model
compiled_model = rebel.compile_from_torch(
    model,
    [("input", [1, 3, 224, 224], torch.float32)],
    # If the NPU is installed on your host machine, you can omit the `npu` argument.
    # The function will automatically detect and use the installed NPU.
    npu="RBLN-CA12",
)

# Save the compiled model to local storage
compiled_model.save("resnet50.rbln")
컴파일된 ResNet50 모델의 배포를 위한 전체 코드는 다음과 같습니다.
import torch
from torchvision.io.image import read_image
from torchvision.models import resnet50, ResNet50_Weights
import urllib.request
import rebel  # RBLN Runtime

# Prepare the input
img_url = "https://rbln-public.s3.ap-northeast-2.amazonaws.com/images/tabby.jpg"
img_path = "./tabby.jpg"
with urllib.request.urlopen(img_url) as response, open(img_path, "wb") as f:
    f.write(response.read())
img = read_image(img_path)
weights = ResNet50_Weights.DEFAULT
preprocess = weights.transforms()
batch = preprocess(img).unsqueeze(0)

# Load the compiled model
module = rebel.Runtime("resnet50.rbln", tensor_type="pt")

# Run inference
rebel_result = module(batch)

# Check results
score, class_id = torch.topk(rebel_result, 1, dim=1)
category_name = weights.meta["categories"][class_id]
print("Top1 category: ", category_name)
compile.py, inference.py 두 가지 테스트 예제가 model ZOO를 통해 제공됩니다.