
[파이썬 쉽게 설명하기] 이미지 자르기 (crop)

실습 교안: 이미지 자르기 튜토리얼
이 튜토리얼에서는 초보자를 위해 Python을 사용하여 이미지를 작은 이미지로 분할하는 방법을 설명합니다. 이 과정을 통해 PIL(Pillow) 라이브러리를 이용한 이미지 처리, 파일 시스템 조작 및 사용자 입력 검증 방법을 배웁니다. 아래 단계별로 설명하겠습니다.
1. 사전 준비
필수 라이브러리 설치
이 튜토리얼에서는 Pillow 라이브러리를 사용합니다. 이 라이브러리를 설치하려면 아래 명령어를 실행하세요:
pip install Pillow코드 전체
아래의 코드를 이해할 수 있도록 하나씩 살펴보겠습니다.
from PIL import Image
import os
import re

def crop_image(image_path, grid_size, output_folder):
    """
    Crop an image into smaller images based on the specified grid size.

    Parameters:
    image_path (str): The path to the input image.
    grid_size (tuple): The number of rows and columns for cropping (e.g., (2, 2) for 2x2 grid).
    output_folder (str): The folder where the cropped images will be saved.
    """
    # Open the image file
    img = Image.open(image_path)
    img_width, img_height = img.size

    # Calculate crop width and height based on the grid size
    crop_width = img_width // grid_size[1]
    crop_height = img_height // grid_size[0]

    # Create output folder if it doesn't exist
    if not os.path.exists(output_folder):
        os.makedirs(output_folder)

    # Initialize counters for cropped image names
    cropped_image_count = 0

    # Loop through the image and crop it
    for row in range(grid_size[0]):
        for col in range(grid_size[1]):
            left = col * crop_width
            top = row * crop_height
            right = left + crop_width
            bottom = top + crop_height

            # Crop the image
            cropped_img = img.crop((left, top, right, bottom))

            # Save the cropped image
            cropped_img_path = os.path.join(output_folder, f'cropped_{row}_{col}.png')
            cropped_img.save(cropped_img_path)
            cropped_image_count += 1

            print(f'Saved cropped image: {cropped_img_path}')

    print(f'Total cropped images: {cropped_image_count}')

def get_grid_size():
    """
    Prompt the user to enter the grid size in the format NxM and validate the input.

    Returns:
    tuple: A tuple containing the number of rows and columns.
    """
    while True:
        grid_size = input("Enter the grid size (e.g., 2*2 for 2x2 grid, between 1*1 and 10*10): ")
        if re.match(r'^[1-9]d**[1-9]d*$', grid_size):
            rows, cols = map(int, grid_size.split('*'))
            if 1 <= rows <= 10 and 1 <= cols <= 10:
                return rows, cols
        print("Invalid input. Please enter the grid size in the correct format (e.g., 2*2) and within the range 1*1 to 10*10.")

# Example usage
if __name__ == "__main__":
    image_path = '/path/to/your/image.png'  # Input image path
    output_folder = 'cropped_images'  # Output folder
    grid_size = get_grid_size()  # Get grid size input from user

    crop_image(image_path, grid_size, output_folder)
2. 코드 분석
2.1 라이브러리 임포트
먼저, 필요한 라이브러리를 가져옵니다.
from PIL import Image
import os
import rePIL라이브러리: 이미지 작업을 위한 라이브러리입니다.os라이브러리: 파일 시스템 작업을 위해 사용됩니다.re라이브러리: 정규 표현식을 사용하여 사용자 입력을 검증하는 데 사용됩니다.
2.2 crop_image 함수
이미지를 자르는 핵심 함수입니다.
def crop_image(image_path, grid_size, output_folder):
    """
    Crop an image into smaller images based on the specified grid size.

    Parameters:
    image_path (str): The path to the input image.
    grid_size (tuple): The number of rows and columns for cropping (e.g., (2, 2) for 2x2 grid).
    output_folder (str): The folder where the cropped images will be saved.
    """
    # 이미지 파일 열기
    img = Image.open(image_path)
    img_width, img_height = img.size

    # 자를 이미지의 가로와 세로 길이 계산
    crop_width = img_width // grid_size[1]
    crop_height = img_height // grid_size[0]

    # 출력 폴더가 없으면 생성
    if not os.path.exists(output_folder):
        os.makedirs(output_folder)

    # 자른 이미지의 이름을 위한 카운터 초기화
    cropped_image_count = 0

    # 이미지를 반복하면서 자르기
    for row in range(grid_size[0]):
        for col in range(grid_size[1]):
            left = col * crop_width
            top = row * crop_height
            right = left + crop_width
            bottom = top + crop_height

            # 이미지를 자름
            cropped_img = img.crop((left, top, right, bottom))

            # 자른 이미지를 저장
            cropped_img_path = os.path.join(output_folder, f'cropped_{row}_{col}.png')
            cropped_img.save(cropped_img_path)
            cropped_image_count += 1

            print(f'Saved cropped image: {cropped_img_path}')

    print(f'Total cropped images: {cropped_image_count}')
주요 부분 설명
Image.open(image_path): 이미지를 엽니다.img.size: 이미지의 가로와 세로 크기를 가져옵니다.os.path.exists및os.makedirs: 출력 폴더가 없으면 생성합니다.이중
for루프를 사용하여 이미지를 행과 열로 반복합니다.img.crop((left, top, right, bottom)): 이미지를 잘라냅니다.cropped_img.save(cropped_img_path): 자른 이미지를 저장합니다.
2.3 get_grid_size 함수
사용자로부터 그리드 크기를 입력받고 유효성을 검사하는 함수입니다.
def get_grid_size():
    """
    Prompt the user to enter the grid size in the format NxM and validate the input.

    Returns:
    tuple: A tuple containing the number of rows and columns.
    """
    while True:
        grid_size = input("Enter the grid size (e.g., 2*2 for 2x2 grid, between 1*1 and 10*10): ")
        if re.match(r'^[1-9]d**[1-9]d*$', grid_size):
            rows, cols = map(int, grid_size.split('*'))
            if 1 <= rows <= 10 and 1 <= cols <= 10:
                return rows, cols
        print("Invalid input. Please enter the grid size in the correct format (e.g., 2*2) and within the range 1*1 to 10*10.")
주요 부분 설명
re.match(r'^[1-9]d**[1-9]d*$', grid_size): 입력 형식을 검증합니다.map(int, grid_size.split('*')):NxM형식의 입력을 분리하여 정수로 변환합니다.유효하지 않은 입력이 들어오면 경고 메시지를 출력하고 다시 입력받습니다.
2.4 메인 프로그램 실행
프로그램이 직접 실행될 때만 실행되는 코드입니다.
if __name__ == "__main__":
    image_path = '/path/to/your/image.png'  # Input image path
    output_folder = 'cropped_images'  # Output folder
    grid_size = get_grid_size()  # Get grid size input from user

    crop_image(image_path, grid_size, output_folder)
사용자에게 그리드 크기를 입력받고, 이를 바탕으로 이미지를 잘라서 저장합니다.
3. 실습
위 코드를 복사하여
crop_image.py파일에 저장합니다.자신의 이미지 파일 경로로
image_path를 수정합니다.터미널에서 다음 명령어로 스크립트를 실행합니다:
python crop_image.py그리드 크기를 입력합니다 (예:
2*2).이미지가 잘리고 결과물이
cropped_images폴더에 저장되는 것을 확인합니다.
이 튜토리얼을 통해 이미지를 자르고 저장하는 과정을 배웠습니다. 더 나아가 이를 응용하여 다양한 이미지 처리 작업에 활용할 수 있습니다.
![[파이썬 쉽게 설명하기] 이미지 자르기 (crop) image 2](https://server.tilnote.io/images/pages/afb98e6e-132e-4363-8714-48c46ad3b198.png)
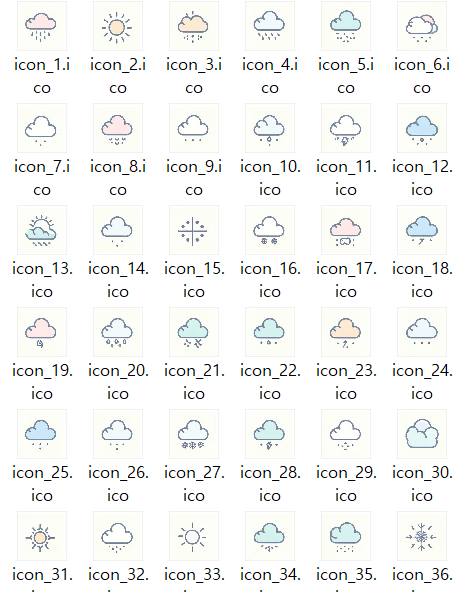
(images 디렉토리 안에 cutting images.png 를 넣습니다.)
![[파이썬 쉽게 설명하기] 이미지 자르기 (crop) image 3](https://server.tilnote.io/images/pages/28a3195e-91c3-4bc3-8f72-5b91e0accfb7.png)
(6*6 과 같은 형식으로 그리드를 입력하면 원하는 크기로 잘라줍니다.)
![[파이썬 쉽게 설명하기] 이미지 자르기 (crop) image 4](https://server.tilnote.io/images/pages/4a58e54e-c152-43ab-b126-b404bb6902f6.png)
(잘려진 이미지는 cropped_images 폴더 안에 저장이 되었습니다.)

(잘려진 이미지)